
Fast Track Training Tips for New Vape Filling Operators
According to Harvard Business Review, companies with strong onboarding programs improve new-hire retention by 82% and productivity by over 70%—which shows why fast-tracking new vape filling operators doesn't require a week-long seminar but a focused, single-shift plan that builds confidence through competence.

By concentrating on a clear day one goal, mastering the non-negotiables of oil temperature and proper capping, and establishing a rhythm of safety and quality checks, you can transform a new hire into a productive team member in a short time.
This guide provides a practical onboarding plan, designed to get new operators running a safe station, producing clean and consistent fills, and protecting your product's integrity from their very first day with the Omni Filler.
The Day One Goal
The first shift is pivotal. Instead of overwhelming a new operator, focus all training on a single, achievable objective that builds confidence and proves their competence by the end of the day.
Defining Success in a Single Shift
The objective for day one is not to create an expert overnight but to build a proficient operator who understands the core workflow. A successful first day means the new team member can independently manage their workstation, complete a full test tray of vape cartridges that passes a first article check, and confidently recap the process from setup to shutdown. This approach transforms passive learning into an active, engaging experience that builds a strong foundation.
The Power of a Tangible Outcome
Using a modern, semi-automated filler makes this production goal both realistic and highly motivating. Imagine the satisfaction a new hire feels when they see that first perfectly filled tray, knowing they accomplished it with minimal hand-holding. This early victory is a powerful catalyst for future success and reinforces the value of their contribution to the team.
Using a Training Matrix for Accountability
To formalize the process, a simple training matrix is an invaluable tool. This document should outline the key competencies for day one, such as workstation setup, safety protocols, machine calibration, and quality checks. As the operator demonstrates proficiency in each area, a lead can sign off on it, providing a clear visual record of their progress. This method not only helps the trainee track their learning but also gives the operations manager a reliable overview of their capabilities.
What is the most critical metric for a new operator's first day?
The most important metric isn't speed or volume; it's the successful completion of one whole, quality-approved test tray. This demonstrates competence in the entire workflow from setup to final inspection.
Safety and Workspace Setup
Before any oil is dispensed, you must establish a firm foundation of safety and organization. This training should be hands-on, instilling a culture of safety and efficiency from the moment the operator steps up to the station.
A well-organized workspace is inherently safer. Introducing these habits on day one ensures they become second nature.
PPE and Hazard Identification: The training must begin with a personal protective equipment (PPE) checklist, including safety glasses, gloves, and a lab coat. Clearly identify all potential hazards in the workspace, such as the heat zones on the filling machine. Marking these "no touch" areas and pointing out the location of safety equipment like an eyewash bottle and fire extinguisher is a non-negotiable first step. As explained in must-have safety features in modern vape fillers, safety habits at the workstation directly protect both operators and the product.
Logical Workflow and Staging: A logical flow prevents errors. Stage empty and filled cartridges in separate, clearly marked bins to eliminate any chance of mix-ups. A designated space for tools, on a tool shadow board, saves time and reduces clutter. Using spill trays and maintaining a clean machines prevent vape oil contamination mindset helps ensure product quality and reduces risk.
The 'Clean as You Go' Mentality: Instill a "clean as you go" mindset from the very beginning. Provide ample lint-free wipes and food-grade ethanol, and encourage their use throughout the shift. This practice is not just about tidiness; it is a fundamental quality control measure that reduces the risk of foreign contaminants entering the product, ensuring a pure and safe final cartridge for the consumer.
ANSI/ISEA Z358.1 guidance requires accessible eyewash stations in case of exposure, and OSHA interprets this as a non-negotiable standard for labs and manufacturing facilities.
Besides PPE, what's a straightforward thing that improves station safety?
A logical workflow layout. Clearly separating raw materials (empty carts) from finished goods (filled carts) and maintaining a clean, organized station drastically reduces the chance of costly mix-ups and accidents.
Oil Prep and Temperature Control
The quality of your final product is decided before it ever enters the filler. This section breaks down the science of viscosity and temperature into simple, repeatable steps for a perfect, even flow that protects your oil's valuable compounds.
The Science of Viscosity and the Temperature Sweet Spot
The process starts with a gentle preheating of the oil, whether you are working with distillate, live resin, or rosin. A water bath provides a consistent and gentle heat source, bringing the oil to a workable temperature without shocking it.
According to a 2023 study in the Journal of Chemical & Engineering Data, the viscosity of CBD- and THC-rich cannabis extracts decreases significantly as temperature rises between 318–403 K (≈45–130 °C). Based on this data, operators often find that the 49–65 °C (120–150 °F) range provides a practical balance: warm enough for smooth filling yet cool enough to protect oil quality.
Homogenization for a Consistent Product
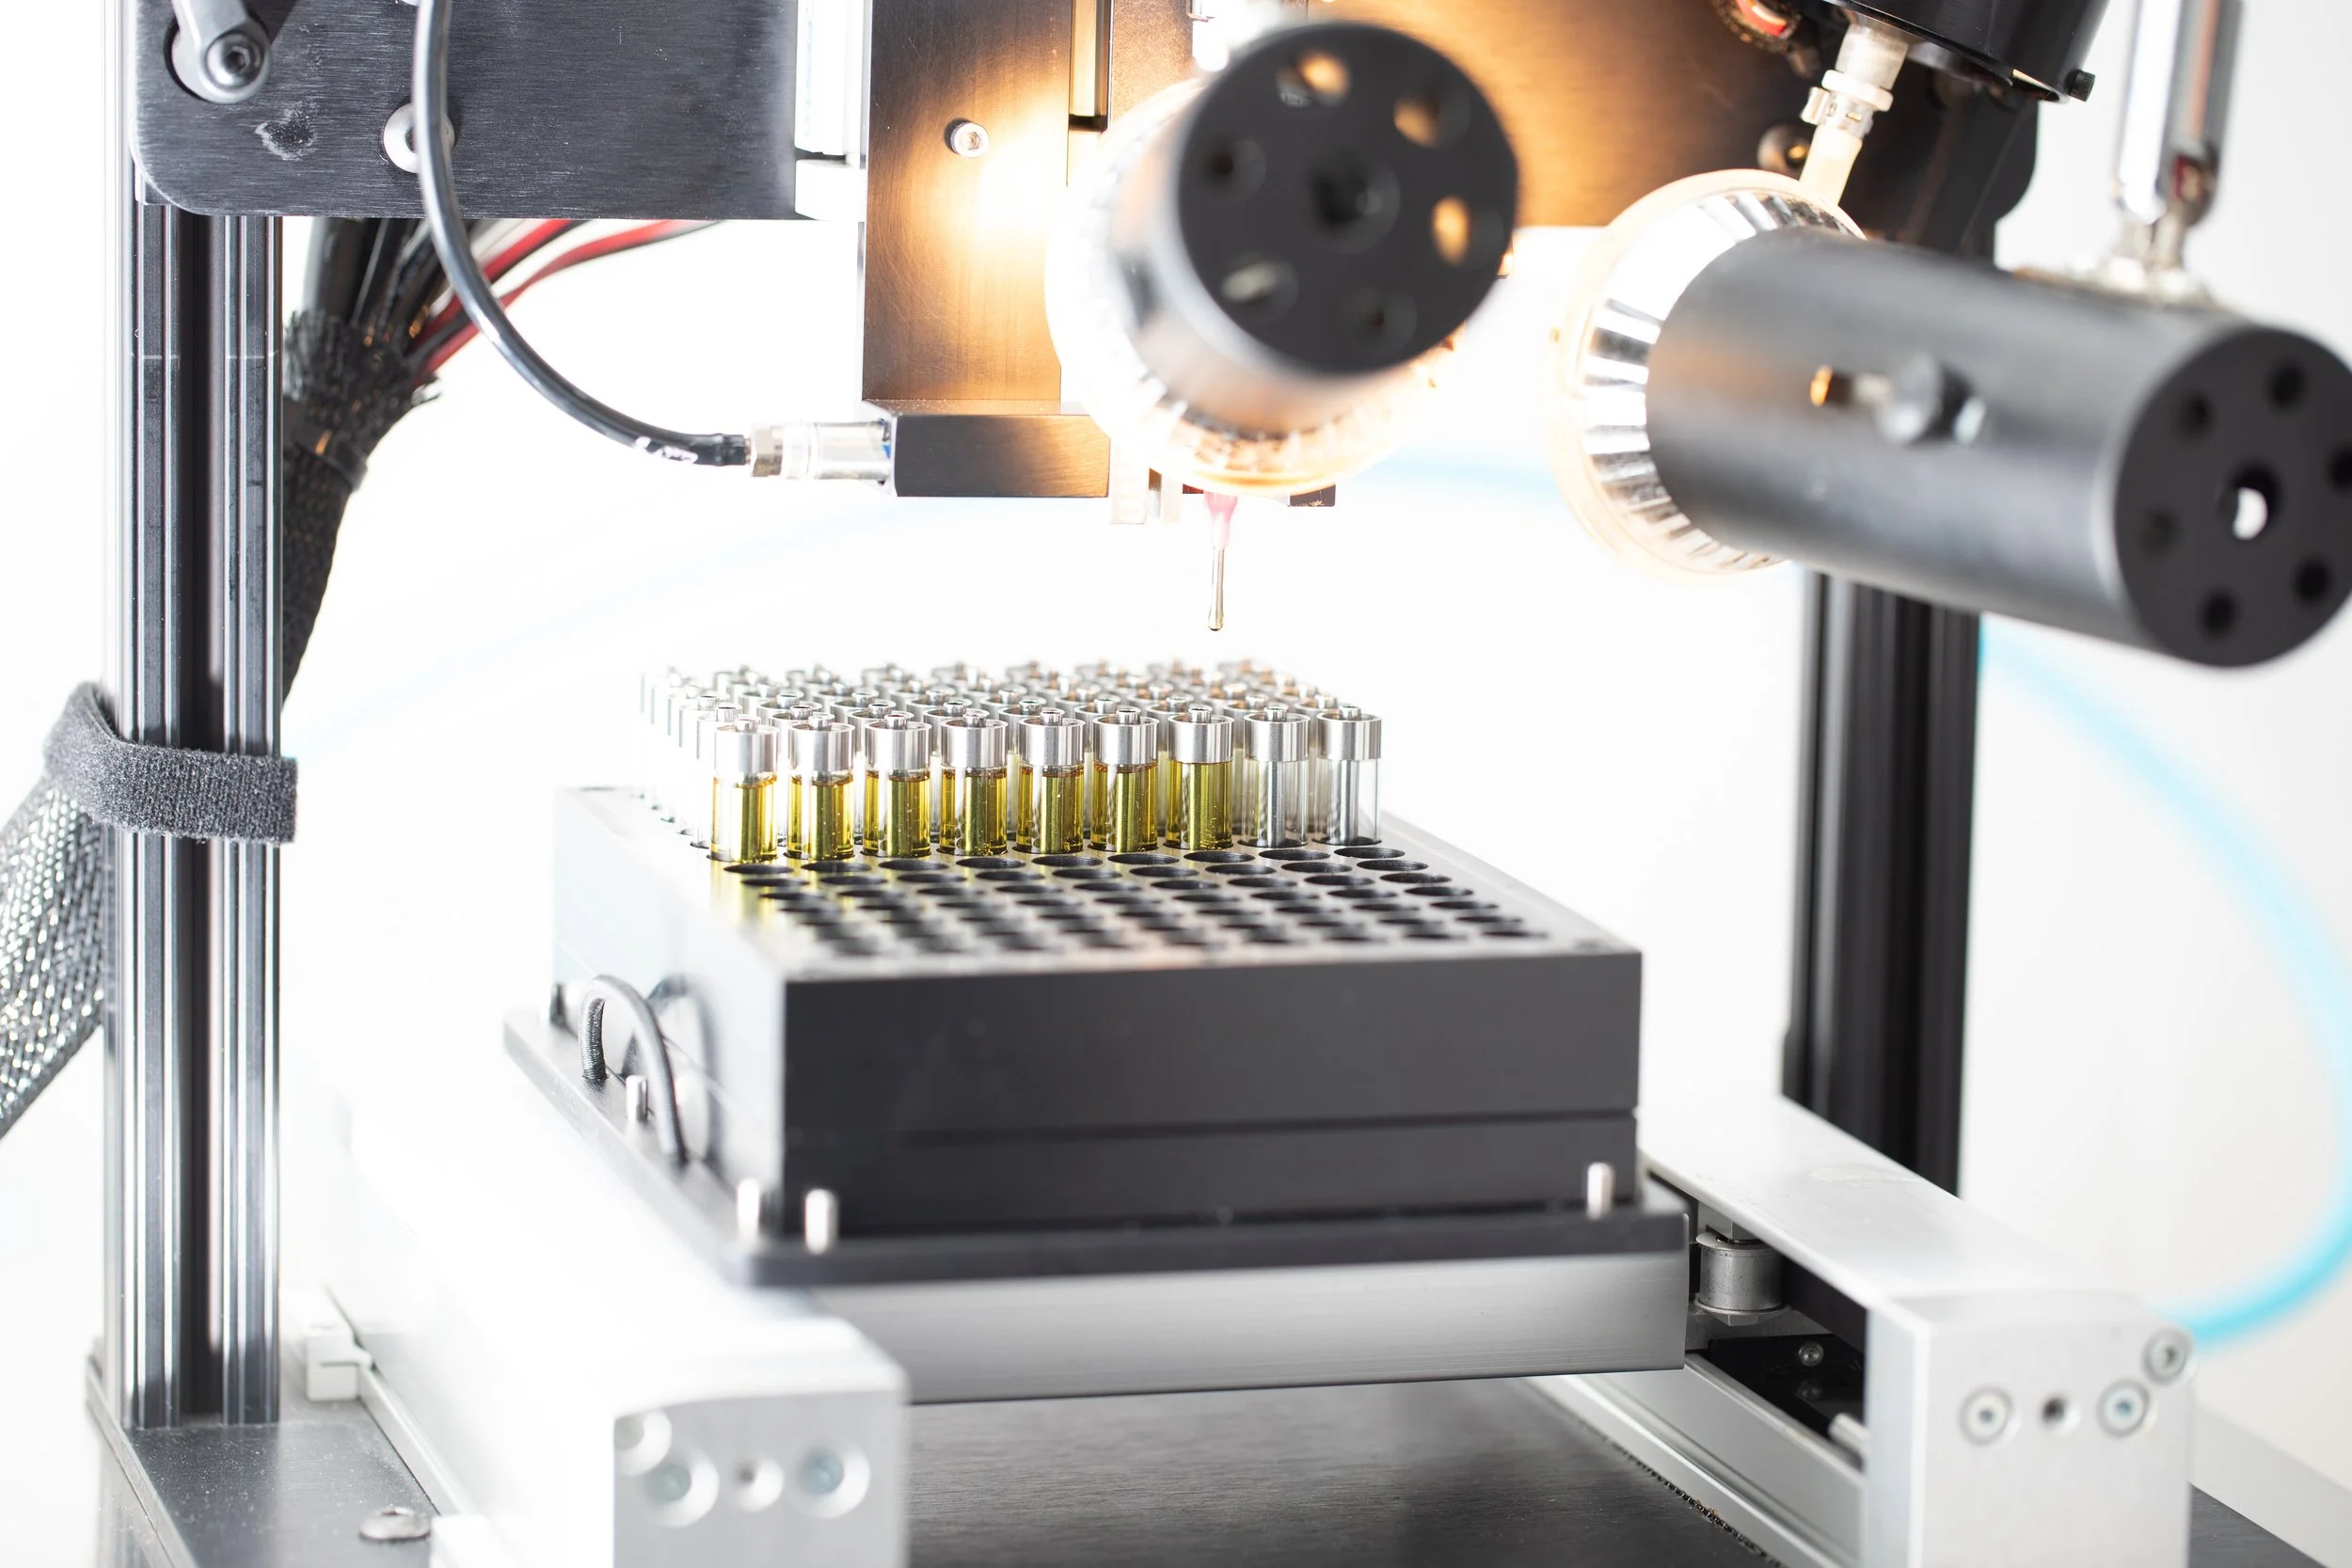
Even if the oil appears uniform, it must be mixed thoroughly before and during the filling process to ensure a consistent cannabinoid and terpene profile in every cartridge. Many modern filling systems include features to simplify this, such as heated reservoirs. A new operator should be taught to observe the oil's consistency, using a simple drip test as a visual aid to get a feel for the target viscosity and ensure every cartridge delivers the same experience.
Protecting Terpenes from Heat Degradation
According to a 2022 study in Frontiers in Chemistry, cannabinoids like CBD and THC begin to degrade when exposed to elevated heat, with dwell time—even brief exposure—accelerating the breakdown into byproducts such as CBN. Overheating is therefore the enemy of a quality vape product: while heat is necessary, too much can strip valuable compounds and alter the oil's chemical profile.
This makes dwell time—the length of time oil is held at a given temperature—critical to control. The goal is to minimize this exposure. Once filling begins, operators should cap cartridges quickly to limit air contact, which research also shows contributes to oxidation and degradation.
Why can't I just heat the oil to a high temperature to increase its flow rate?
Excessive heat destroys the delicate terpenes that create your product's unique flavor and aroma. This permanently degrades the oil's quality, resulting in a harsh, flavorless product that will fail to meet customer expectations.
Machine Familiarization and Calibration
With the oil prepped, it's time to introduce the operator to the filling equipment. The goal is to demystify the technology and empower the operator to take full control of the filling process for precise, repeatable results.
A Guided Tour of the Machine's Controls
The introduction should begin with the control panel. Explain each button and its function clearly, demonstrating how to navigate menus and access key modes like calibration and production. A key feature to highlight is the ability to save profiles. Features like savable profiles, found on systems such as the Omni Filler, are invaluable for recalling specific settings for different oil types, saving time and ensuring consistency.
Hands-On Calibration for Dosing Accuracy
Calibration is a hands-on process that must be demonstrated. The "five test shots into a cup" method is a simple and effective training tool. Have the operator run five test dispenses into a tared cup on a calibrated scale. Guide them through weighing the cup, calculating the average dispense volume, and adjusting the settings as needed. Repeating this process until the target weight is achieved reinforces the importance of accuracy. Once dialed in, have them save the settings as a new profile for that specific oil.
The Importance of First Article Checks
The principle of "trust, but verify" is crucial in production. Emphasize that before any full production run, a first article check is mandatory. This involves filling a single cartridge or a small sample set and verifying that it meets all quality standards, including fill weight, appearance, and headspace. This, combined with routine checks of the scale's calibration, instills a mindset of precision and ensures every cartridge meets the highest quality standards.
How often should I recalibrate the vape filling machine?
You should perform a full calibration at the start of every new batch of oil, as viscosity can vary. It is also best practice to perform quick weight verifications of one or two cartridges periodically during a long run to ensure dosing remains consistent.
Filling Technique Fundamentals
An operator's attention to detail during the fill makes all the difference. The goal is to fill each cartridge cleanly and accurately, with an unwavering focus on the most critical step: avoiding the airway.
A few simple techniques can dramatically reduce filling errors and improve overall quality.
Tray Loading and Alignment: Proper tray handling is the first step. Teach the operator to ensure trays are clean and free of debris. The alignment of the tray is critical for a successful fill. Most tray-based fillers have alignment pins to make this process simple, but the operator should be trained to always double-check the tray's seating before initiating a fill cycle to prevent broken cartridges and product loss.
The First Five Spot Check: This is a simple yet powerful quality control gate. The operator should be trained to perform a spot check on the first five units filled in any new tray. They should look for bubbles, which could indicate an issue with the oil's temperature or the machine's priming, and verify the fill height, ensuring a small amount of headspace remains for the mouthpiece.
Mastering Airway Avoidance: According to analyses of ENDS (electronic nicotine delivery system) cartridge architecture, these devices rely on a central airflow tube that must remain clear for proper vaporization. For this reason, the center tube of the cartridge must remain completely free of oil. Teach the operator to watch the nozzle as it dispenses, ensuring the oil flows along the inner wall of the cartridge, not directly down the middle.
What's the most common filling error, and how can I prevent it?
The most common and costly error is getting oil into the center airway tube. This is prevented by instilling the habit of always visually confirming the oil stream is dispensing along the inner wall of the cartridge, not down the middle.
Cap and Seal Without Leaks
The job isn't done until the cartridge is sealed. Capping immediately while the oil is still warm ensures a vacuum lock seal. Automated systems reinforce this, as highlighted in how to fill vape cartridges automatically, where speed and timing prevent oxidation and leaks.
The Critical Role of Timing and Vacuum Lock
Timing is everything. For the best seal, the mouthpiece should be applied immediately after the cartridge is filled. As the warm oil inside the cartridge cools, it contracts, creating a slight vacuum. This vacuum helps pull the mouthpiece down, forming a tight, secure seal that prevents leaks. This is known as a vacuum lock. If an operator waits too long to cap, the oil will cool, and the vacuum effect will be lost, significantly increasing the risk of future leaks.
Matching Capping Technique to Cartridge Type
The proper capping method depends on the hardware. For screw on mouthpieces, applying the correct amount of torque is essential. A preset torque driver is the best tool for this, as it prevents both overtightening, which can strip threads or crack the cartridge, and undertightening, which results in a loose seal. For snap-on caps, the operator needs to be trained to listen and feel for the distinct "click" that confirms the cap is thoroughly and evenly seated.
Establishing a Clear Rework Policy
Mistakes can happen, so having a clear rework policy is essential. If a cartridge is found to be improperly capped or leaking, what is the procedure? Should it be discarded, or can it be salvaged? Clear guidelines prevent confusion and ensure all operators follow the same protocol. Citing vendor guidance, such as keeping fill temperatures on the lower end of the workable range to allow more capping time, can also provide practical tips that reduce errors.
Does it really matter how quickly I cap the cartridges after filling?
Yes, it is one of the most critical steps. Capping immediately while the oil is still warm is essential for creating the vacuum lock that prevents leaks. Waiting even a minute or two can compromise the seal.
Clean in Place and Daily Shutdown
The last lesson of the day is vital for the first lesson of tomorrow. A consistent end-of-shift routine protects your investment, ensures uptime, and makes for a smooth start to the next shift.
A disciplined shutdown procedure prevents costly downtime and ensures the machine is ready for the next shift.
Purge and Flush Sequence: The clean machines prevent vape oil contamination routine on most automated fillers is designed for efficiency. The first step is to purge any remaining oil from the system using the machine's purge cycle. Immediately following the purge, the system must be flushed with a cleaning agent like food-grade ethanol. This removes residual oil and prevents buildup that leads to clogs and cross-contamination between batches.
Final Wipe Down and Workspace Reset: After the internal flush cycle is complete, the machine's exterior should be thoroughly wiped down, including the control panel and the heat plate (once cool). All tools should be cleaned and returned to their designated storage locations. This resets the station to a perfect starting point for the next operator.
Log Settings and Stage for Tomorrow: The final step is to log the day's settings and batch number in a maintenance log. This data is invaluable for troubleshooting and process improvement. The operator should then follow the correct shutdown order, securing any hot surfaces and staging the machine so it is immediately ready for the next shift. This discipline ensures a smooth and efficient start to every day.
What happens if we skip the end-of-day cleaning routine just once?
Skipping the routine allows residual oil to harden in the fluid path. This can cause clogs, lead to complex and time-consuming deep cleaning, create cross-contamination between batches, and potentially cause machine downtime.
| Training Module | Key Learning Objectives | Common Mistakes to Avoid |
|---|---|---|
| Safety and Workspace Setup | Proper PPE usage, identification of heat zones, and maintaining a clean and organized workstation are essential. | Cluttered workspace, ignoring safety warnings, and improper handling of cleaning solvents. |
| Oil Prep and Temperature Control | Understanding the ideal temperature window, proper homogenization techniques, and terpene retention is crucial. | Overheating the oil, insufficient mixing, and ignoring the decarb status. |
| Machine Familiarization and Calibration | Basic controls, saving profiles, and accurate volume verification using a scale. | Skipping the calibration step, incorrect profile settings, and not performing first article checks. |
| Filling Technique Fundamentals | Proper tray alignment, spot checking the first five units, and avoiding the airway. | Misaligned trays, not checking for bubbles, and dispensing oil into the center tube. |
| Cap and Seal Without Leaks | The importance of immediate capping, correct torque application, and verifying a proper seal. | Waiting too long to cap, over- or under-tightening screw caps, and not ensuring snap caps are fully seated. |
| Clean in Place and Daily Shutdown | Following the correct purge, flush, and wipe down procedure, and logging daily settings. | Skipping the CIP routine, improper cleaning of the nozzle and reservoir, and not maintaining a maintenance log. |
From New Hire to Production Pro
The path from a new hire to a proficient vape-filling operator doesn't need to be long or complex. By implementing these fast-track training tips, you can empower your new team members to be productive, safe, and confident from their very first shift. The key is to provide a structured, hands-on learning experience that centers on the fundamentals of safety, quality, and machine operation.
Ready to see how equipment designed for speed, accuracy, and ease of training can elevate your production standards? Request a demo of the Omni Filler today and let us show you how our technology can help you achieve your filling goals faster.
Frequently Asked Questions
1. What is the ideal humidity level for a vape filling room?
While temperature is the more critical factor for the oil itself, maintaining a controlled environment in your filling room is also essential. A relative humidity of 40-50% is generally recommended. High humidity can affect the curing of some cartridge materials and potentially introduce moisture into the product. In contrast, low humidity can increase the risk of static electricity, which can be a concern when working with electronic equipment.
2. How often should the Omni Filler's tubing be replaced?
The frequency of tubing replacement will depend on your production volume and the types of oils you are using. For high-volume operations or if you are frequently switching between different types of oil, it is a good practice to inspect the tubing weekly for any signs of wear, discoloration, or residue buildup.
3. What is the best way to clean up a major oil spill?
In the event of a large spill, the first step is to ensure the safety of the area. If the spill is near any hot surfaces, turn them off and allow them to cool. Use absorbent pads or a commercial oil absorbent to soak up the bulk of the spill. Once the majority of the oil has been absorbed, you can use a solvent like food-grade ethanol to clean the remaining residue. Always refer to your facility's specific spill cleanup protocol and ensure the area is well ventilated.
4. Can the Omni Filler handle very thick oils like rosin?
Yes, the Omni Filler is designed for high-precision vape cartridge filling. The key is to properly prepare the oil by gently heating it to the correct working temperature. The key is to properly prepare the oil by gently heating it to the correct working temperature. The Omni Filler's heated reservoir and precise temperature control ensure that the oil remains at the optimal viscosity throughout the filling process. For very thick oils, you may need to use a slightly higher temperature and a slower dispense speed to achieve the best results.
5. What are some common signs of operator fatigue to watch out for?
Operator fatigue can lead to a decrease in quality and an increase in safety risks. Some common signs to watch out for include a decline in attention to detail, an increase in minor errors, slower reaction times, and a general lack of focus. To combat fatigue, ensure that your operators are taking regular breaks, staying hydrated, and working in a comfortable and ergonomic environment. If you notice signs of fatigue, consider rotating tasks or providing a short break to allow the operator to rest and refocus.